How To Remove Red Vertical Line In Word 2016
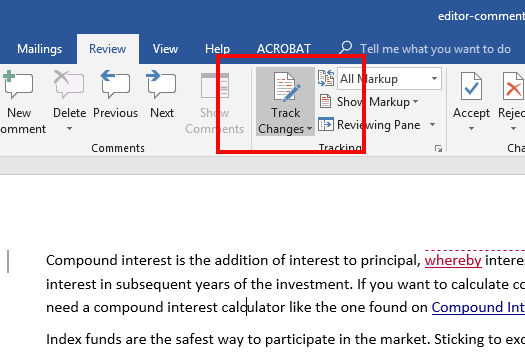
This tab contains tools to help with spell checking and editing including the Track Changes feature. Grey shading is a way to warn you about it.
2016 Microsoft Word Remove Editor Comments Papercheck
I cannot just delete it by backspace or DELETE key Peter.
How to remove red vertical line in word 2016. In other instances you might have really wanted the characters in your document not the line that Word thought you wanted. How can I get rid of the vertical line. Change the way that markup is displayed.
In the toolbar at the top of the screen click the Review tab. For example to change the formatting that is displayed when someone inserts new text click an option from the drop-down menu next to Insertions. Their width is not changed by justification.
By default Word assigns a. The vertical line will instantly disappear. Go to Display Go to Page borders Borders click none in Settings then OK.
It is NOT the cursor. This feature places a red line in the margins next to any edited text. Comments - Enables you to define how Word should color comments - different colors for each person entering comments or a specific color for all of them.
You must replace them by ordinary space if this nit the intended end-result or as suggested paste special as text without styling. Or to omit them altogether. To remove it go to the Review tab and click on Accept.
Just a note to let you know that this advice continues to. Click Review Track Changes. I got a document where on a certain line there is a vertical line at the left side.
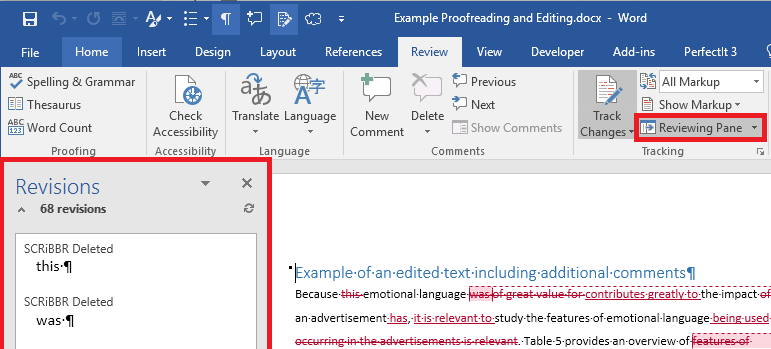
When using Words Track Changes you may see a vertical red line on the left side. Second you need to display Words non-printing characters. To remove this simply select the message content you.
There are many uses for vertical lines and they can really make your Word document. On the Review tab click Markup Options Preferences. Highlight all your text including the tiny bit of grey that goes over the dotted lines.
I added shadow to the text formatting and maybe depending on the text size etcit could look similar to spell check lines and that would print. If you cant select a line to delete it might actually be a horizontal line which is a type of border. Delete lines or connectors.
First you can press CtrlZ right after you pressed Enter and Word added the line. First remember that the line added by Word is really a paragraph border. Maybe check the text formatting highlight the text right click Format Text Effects.
Once all vertical lines have been cleared you will likely be left with a bit of margin space to the right of your e-mail content. As needed to remove any additional vertical lines. Changed lines - Enables you to tell Word where to place the vertical line indicating a change - on the left border the right border or the outside border.
You can undo this by immediately pressing CtrlZ. To get rid of the red line which shows which parts of the text or all of it contain tracked changes click the down arrow on the Accept button and click Accept All Changes. Click the line connector or shape that you want to delete and then press Delete.
Then save the document. If you later want to delete the line there are two things you can do that will help you. In this case the line is removed and your characters remain.
As you can see from the attached snapshot it is an additional line. In these instances there are three ways you can handle the situation. In this video I show you how to insert vertical lines in Microsoft Word.
The snapshot shows the cursor AND the line. In the Track Changes dialog box you can control how you want markup to appear in your document. How To Run A Redline In Word.
2018 update For Microsoft 3652016. This video shows you how to remove the vertical lines on the left side of a document when the track changes function in word has been used. Remember that non-breaking spaces are not ordinary spaces.
Click the Track Changes button to enable Track Changes. If you want to delete multiple lines or connectors select the first line press and hold Ctrl while you select the other lines and then press Delete. It is not a real line.
To get rid of the red line which shows which parts of the text or all of it contain tracked changes click the down arrow on the Accept button and click Accept All Changes.

How To Remove Red Underline In Word 2020 2016 2010 2007 2003
I Cannot Make The Red Vertical Lines On The Left Side Disappear

How To Remove Red Underline In Word 2020 2016 2010 2007 2003
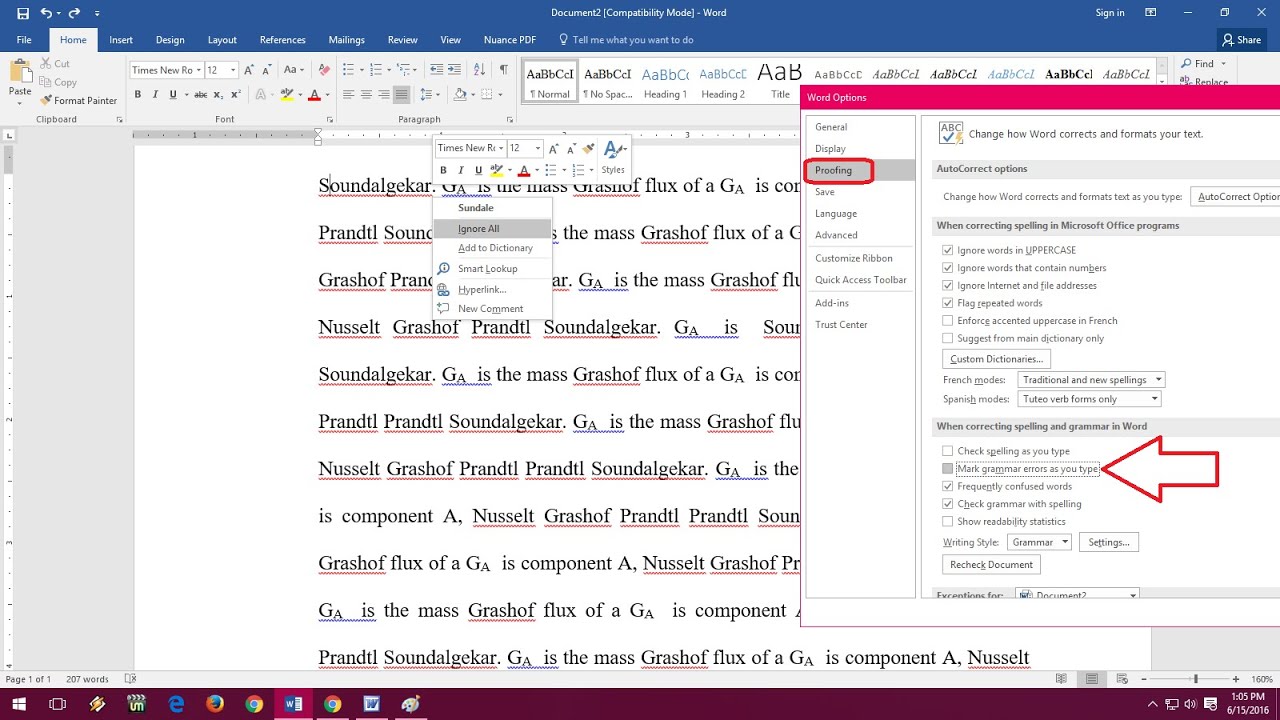
How To Remove Turn Off Red Green Blue Lines In Ms Word Spelling Errors Youtube
I Cannot Make The Red Vertical Lines On The Left Side Disappear
I Cannot Make The Red Vertical Lines On The Left Side Disappear
I Cannot Make The Red Vertical Lines On The Left Side Disappear
I Cannot Make The Red Vertical Lines On The Left Side Disappear

How To Remove Red Underline In Word 2020 2016 2010 2007 2003
Post a Comment for "How To Remove Red Vertical Line In Word 2016"