How To Remove Red Lines In Word Document
Replied on July 7 2011. Check the boxes for Hide spelling errors in this document andor Hide grammar errors in this document.
Remove Red And Green Underlines In Word Mike S Draft Article Bin
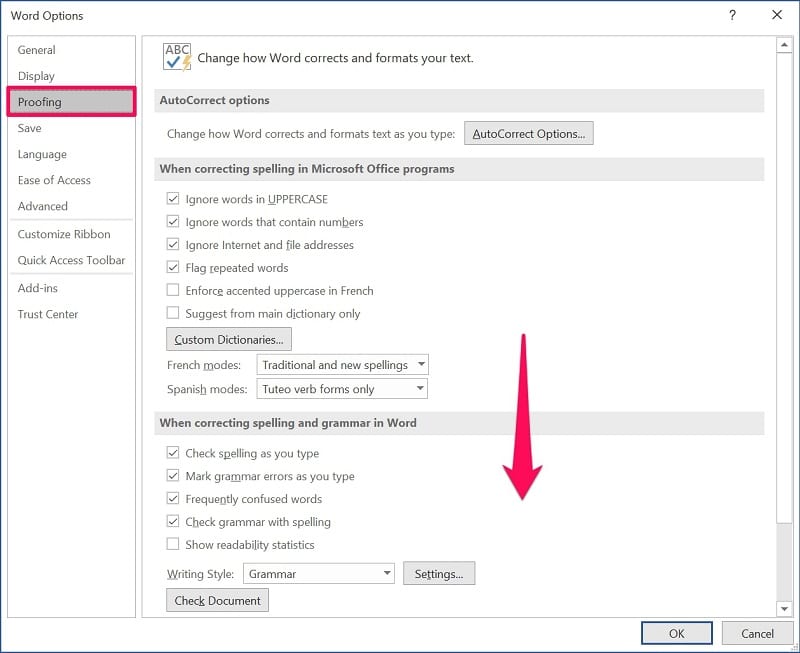
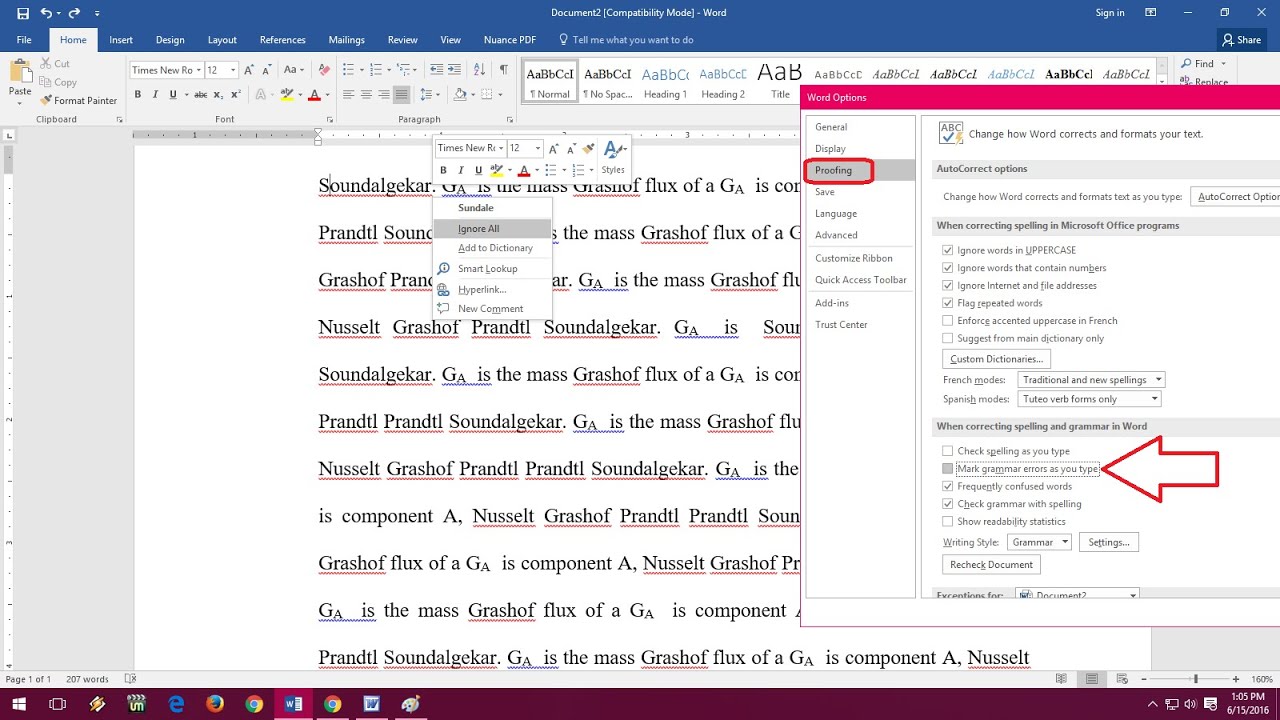
Click Proofing from the navigation bar move down and select the box Check spelling as you type.
How to remove red lines in word document. First open the Ms Word document that you want to remove the red line. Go to the Review tab and click on Accept Word 2019. This method will work word 2003 to 2016Click here for more detailht.
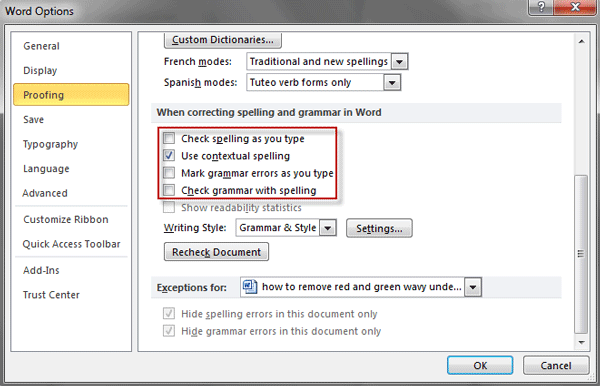
In any case if you dont want the red or green underlines to appear in the document when read on other systems you will need to. Find the section When correcting spelling and grammar in Word and do as following. I cannot make the red vertical lines on the left side disappear.
Click on the arrow under Delete and select Delete All Comments in Document. Click the Track Changes button to enable Track Changes. Select it and click Word Options to remove the red line in Word.
What is the way to Redline a document in Microsoft Word. Now when you press TAB while typing on that line instead of just indenting your text a bit you can type text aligned to. In Word Options select Proofing.
Please see below for details. Then click the Office Button in the upper left corner of your Word worksheet. Make sure the Home tab is active.
Microsoft Word Shades Turning Off Grammar Mac Download. Simply you just need to turn off the Proofing tool. Open the document.
Choose Options from the menu on the left. Now double click on the marker and change the alignment to right. Youve turned on Tracked Changes which happens to be configured to mark deletions in red with a strikethrough line.
Go to the Comment section of the Review tab. This red line is there because there are still changes in the document that need to be accepted which can be minor changes like double spaces or a wrongly placed comma. If you are already in it you click to uncheck the words Check to spell as you type to remove the red line.
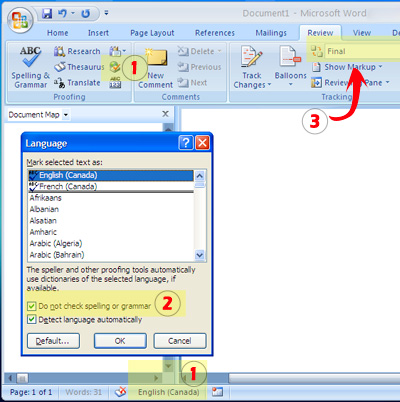
Redlining is a form of editing in which red ink is used to indicate removal or addition of text in Microsoft Word. Tick the box next to Do not check spelling or grammar. Open the drop-down menu next to the Track Changes button.
Click on Accept all changes and Stop Tracking. So the question is how to remove the red line in Word. To do that Step 1.
Click in the ruler to place a tab marker and then drag it over to the right hand side of your page. Click the File tab to go to Backstage view then click Options. Put the cursor above the line.
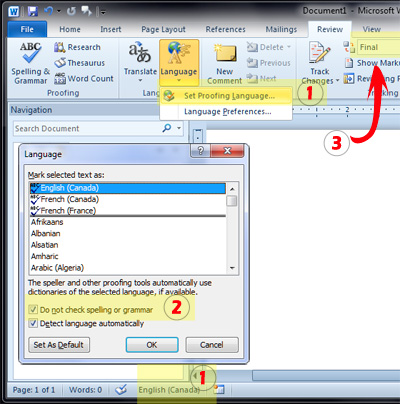
Select the language you use in the Word document. Hide Red Green Blue Lines from the word disable spell and grammar check in word doc. If it has been unchecked now just click ok done then the red line in the text automatically disappears.
Now when you upload your document to Blackboard it will look normal see image below and will have neither comments nor tracked changes in the margin. Press CTRL-A to select all of the text in the document. Click the Show Markup drop-down menu.
To get rid of the red line which shows which parts of the text or all of it contain tracked changes click the down arrow on the Accept button and click Accept All. Alternative way to remove red and green wavy underlines in current Word document only. Click Borders tab click None click OK.
Redline a Document in Microsoft Word In the toolbar at the top of the screen click the Review tab. Several options will appear for settings. Later an Office window will appear with several menus.
Open the Word document. Go to Tools Options Spelling Grammar. Click Review Language Set Proofing Language on the Menu bar of the Word document.
Select Proofing. To remove the line place the cursor in the paragraph just above where the line was added. How to remove red underline in word.
Click the File tab from ribbon. Go to File tab select Options. In the menu at the top of the Word document click the Review tab.
You can redline a Microsoft Word document by using Microsoft Words built-in Track Changes feature or you can manually redline the document with font color changes and strike-throughs. Microsoft Word turns on Spell check and Grammar check by default. Click OK at the bottom.
Why is the red line not showing on Word. Click on the language indicator found in the status bar of the Word window. When you press Enter at the end of the characters that Word replaces with the line Word removes the characters and adds a bottom border to the paragraph just above the one where you typed the characters.
If you just want to remove few horizontal lines you can manually remove them as follows. Click on the Page Borders item in the Page Background group of Design tab. The shortcut CtrlShiftE or the Track Changes button on the Reviewing tab of the ribbon will turn the tracking off and on again if you press it again.
This method is useful because it hides spelling grammar errors only in a. After that click the Proofing menu tab. The red wavy underlines just mean flagged spelling errors and the green underlines mean fla.
Check the box next to Hide spelling errors in this document only and Hide grammar errors in this document only then click OK. Fortunately Word allows you to hide spelling and grammar errors so the lines will not show up on any computer.

How To Remove Red Underline In Word 2020 2016 2010 2007 2003
How To Remove Red Lines In Microsoft Word Documents Wincope

How To Remove Red Underline In Word 2020 2016 2010 2007 2003
I Cannot Make The Red Vertical Lines On The Left Side Disappear
How To Remove Red And Green Wavy Underlines In Word Document
How To Remove Turn Off Red Green Blue Lines In Ms Word Spelling Errors Youtube
I Cannot Make The Red Vertical Lines On The Left Side Disappear
I Cannot Make The Red Vertical Lines On The Left Side Disappear
Remove Red And Green Underlines In Word Mike S Draft Article Bin
Post a Comment for "How To Remove Red Lines In Word Document"